主页 > 前端 > javascript >
来源:自学PHP网 时间:2017-04-19 10:23 作者: 阅读:次
[导读] 这篇文章主要为大家详细介绍了微信小程序实战之自定义抽屉菜单效果,具有一定的参考价值,感兴趣的小伙伴们可以参考一下...
|
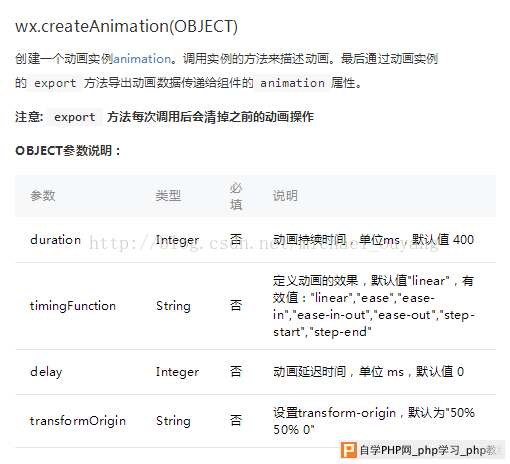
微信提供了动画api,就是下面这个
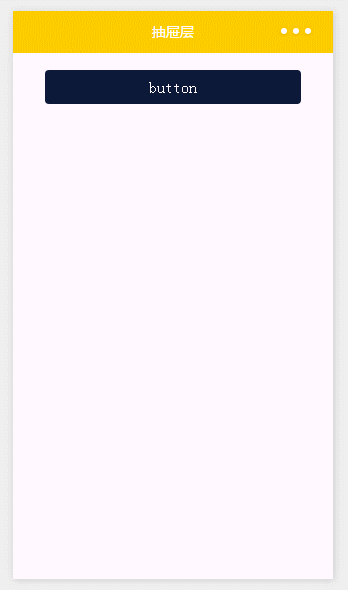
相关链接:https://mp.weixin.qq.com/debug/wxadoc/dev/api/api-animation.html#wxcreateanimationobject 通过使用这个创建动画的api,可以做出很多特效出来 下面介绍一个抽屉菜单的案例 实现代码:
<!--button-->
<view class="btn" bindtap="powerDrawer" data-statu="open">button</view>
<!--mask-->
<view class="drawer_screen" bindtap="powerDrawer" data-statu="close" wx:if="{{showModalStatus}}"></view>
<!--content-->
<!--使用animation属性指定需要执行的动画-->
<view animation="{{animationData}}" class="drawer_attr_box" wx:if="{{showModalStatus}}">
 <!--drawer content-->
 <view class="drawer_content">
 <view class="drawer_title line">菜单1</view>
 <view class="drawer_title line">菜单2</view>
 <view class="drawer_title line">菜单3</view>
 <view class="drawer_title line">菜单4</view>
 <view class="drawer_title">菜单5</view>
 </view>
</view>
wxss:
/*button*/
.btn {
 width: 80%;
 padding: 20rpx 0;
 border-radius: 10rpx;
 text-align: center;
 margin: 40rpx 10%;
 background: #0C1939;
 color: #fff;
}
/*mask*/
.drawer_screen {
 width: 100%;
 height: 100%;
 position: fixed;
 top: 0;
 left: 0;
 z-index: 1000;
 background: #000;
 opacity: 0.2;
 overflow: hidden;
}
/*content*/
.drawer_attr_box {
 width: 100%;
 overflow: hidden;
 position: fixed;
 bottom: 0;
 left: 0;
 z-index: 1001;
 background: #fff;
}
.drawer_content {
 padding: 20rpx 40rpx;
 height: 470rpx;
 overflow-y: scroll;
}
.drawer_title{
 padding:20rpx;
 font:42rpx "microsoft yahei";
 text-align: center;
}
.line{
 border-bottom: 1px solid #f8f8f8;
}
js:
Page({
 data: {
 showModalStatus: false
 },
 powerDrawer: function (e) {
 var currentStatu = e.currentTarget.dataset.statu;
 this.util(currentStatu)
 },
 util: function(currentStatu){
 /* 动画部分 */
 // 第1步:创建动画实例
 var animation = wx.createAnimation({
  duration: 200, //动画时长
  timingFunction: "linear", //线性
  delay: 0 //0则不延迟
 });

 // 第2步:这个动画实例赋给当前的动画实例
 this.animation = animation;

 // 第3步:执行第一组动画:Y轴偏移240px后(盒子高度是240px),停
 animation.translateY(240).step();

 // 第4步:导出动画对象赋给数据对象储存
 this.setData({
  animationData: animation.export()
 })

 // 第5步:设置定时器到指定时候后,执行第二组动画
 setTimeout(function () {
  // 执行第二组动画:Y轴不偏移,停
  animation.translateY(0).step()
  // 给数据对象储存的第一组动画,更替为执行完第二组动画的动画对象
  this.setData({
  animationData: animation
  })

  //关闭抽屉
  if (currentStatu == "close") {
  this.setData(
   {
   showModalStatus: false
   }
  );
  }
 }.bind(this), 200)

 // 显示抽屉
 if (currentStatu == "open") {
  this.setData(
  {
   showModalStatus: true
  }
  );
 }
 }
})
以上就是本文的全部内容,希望对大家的学习有所帮助,也希望大家多多支持自学php网。 |
自学PHP网专注网站建设学习,PHP程序学习,平面设计学习,以及操作系统学习
京ICP备14009008号-1@版权所有www.zixuephp.com
网站声明:本站所有视频,教程都由网友上传,站长收集和分享给大家学习使用,如由牵扯版权问题请联系站长邮箱904561283@qq.com