来源:未知 时间:2017-04-26 14:00 作者:xxadmin 阅读:次
[导读] centos 6.5 x64为例, node.js下载地址 https://nodejs.org/en/download/stable/ 下载截图 建议采用稳定编译过的版本,source code稍麻烦,编译过的直接可用,安装超级简单,红色的是centos X64可用地址。...
|
centos 6.5 x64为例,
下载截图
1、下载安装包[root@localhost software]# wget http://nodejs.org/dist/v5.7.1/node-v5.7.1-linux-x64.tar.xz --2016-03-06 14:17:04-- http://nodejs.org/dist/v5.7.1/node-v5.7.1-linux-x64.tar.xz Resolving nodejs.org... 104.20.22.46, 104.20.23.46Connecting to nodejs.org|104.20.22.46|:80... connected. HTTP request sent, awaiting response... 200 OKLength: 8374600 (8.0M) [application/x-xz] Saving to: “node-v5.7.1-linux-x64.tar.xz”100%[=====================================================================================================================================================>] 8,374,600 41.5K/s in 2m 22s 2016-03-06 14:19:37 (57.7 KB/s) - “node-v5.7.1-linux-x64.tar.xz” saved [8374600/8374600] 原始https链接容易下不下来,看网络情况,可以去掉s后下载快些。 2、解压文件tar.xz因为是tar.xz结尾的文件,要xz一下,再tar一下。 [root@localhost software]# xz -d node-v5.7.1-linux-x64.tar.xz [root@localhost software]# tar -xvf node-v5.7.1-linux-x64.tar ode-v5.7.1-linux-x64/node-v5.7.1-linux-x64/bin/node-v5.7.1-linux-x64/bin/npmnode-v5.7.1-linux-x64/bin/nodenode-v5.7.1-linux-x64/share/node-v5.7.1-linux-x64/share/man/node-v5.7.1-linux-x64/share/man/man1/node-v5.7.1-linux-x64/share/man/man1/node.1node-v5.7.1-linux-x64/share/systemtap/node-v5.7.1-linux-x64/share/systemtap/tapset/node-v5.7.1-linux-x64/share/systemtap/tapset/node.stpnode-v5.7.1-linux-x64/share/doc/node-v5.7.1-linux-x64/share/doc/node/ node-v5.7.1-linux-x64/share/doc/node/gdbinitnode-v5.7.1-linux-x64/LICENSEnode-v5.7.1-linux-x64/include/node-v5.7.1-linux-x64/include/node/ node-v5.7.1-linux-x64/include/node/zconf.hnode-v5.7.1-linux-x64/include/node/uv-sunos.h [root@localhost software]# cd node[root@localhost node]# cd bin [root@localhost bin]# ./node -vv5.7.1 等待解压完成,建议把解压后的目录改为node,或者其他有意义的名字,不然node升级太快在原有基础上升级但是文件目录显示的版本名又不匹配。 3、配置node全局运行export NODE_HOME=/file/software/nodeexport PATH=$NODE_HOME/bin:$PATH #找到下边这一行添加进去,记得你自己的路径搞对了。export PATH USER LOGNAME MAIL HOSTNAME HISTSIZE HISTCONTROL 重启一下试试看,node,npm都可以全局启用。 推荐上面的全局配置方式,当然配置软链接也可以全局命令行,这个不推荐。 [root@localhost bin]# ln -s /file/software/node/bin/node /usr/local/bin/node[root@localhost bin]# ln -s /file/software/node/bin/npm /usr/local/bin/npm[root@localhost bin]# cd /[root@localhost /]# dirbin boot cgroup dev etc file home lib lib64 lost+found media mnt opt proc root sbin selinux srv sys tmp usr var[root@localhost /]# npm -v3.6.0[root@localhost /]# 之前基本的环境已经搭建完成,但是光有这个还不足够。 4、pm2保驾护航forever已经out了,严重推荐pm2方式运行nodejs,这是最好的,没有之一。 [root@localhost /]# npm install -g pm2开始下载安装文件 │ └── minimist@0.0.8 ├── moment@2.11.2 ├─┬ nssocket@0.6.0 │ └── lazy@1.0.11 ├── pidusage@1.0.1 ├─┬ pm2-axon@2.0.9 │ ├── amp@0.3.1 │ ├── amp-message@0.1.2 │ ├── configurable@0.0.1 │ └── escape-regexp@0.0.1 ├─┬ pm2-axon-rpc@0.3.6 │ ├─┬ commander@1.0.5 │ │ └── keypress@0.1.0 │ └── json-stringify-safe@5.0.1 ├─┬ pm2-deploy@0.2.1 │ ├── async@1.4.2 │ └── tv4@1.0.18 ├─┬ pm2-multimeter@0.1.2 │ └── charm@0.1.2 ├── pmx@0.6.1 ├── semver@5.1.0 ├── shelljs@0.6.0 ├─┬ source-map-support@0.4.0 │ └─┬ source-map@0.1.32 │ └── amdefine@1.0.0 └─┬ vizion@0.2.12 └── async@0.9.0 runTopLevelLifecycles ▌ ╢████████████████████████████████████████████████████████████████████████████████ npm WARN optional Skipping failed optional dependency /pm2/chokidar/fsevents: runTopLevelLifecycles ▀ ╢████████████████████████████████████████████████████████████████████████████████ npm WARN notsup Not compatible with your operating system or architecture: fsevents@1.0.8runTopLevelLifecycles ▐ ╢████████████████████████████████████████████████████████████████████████████████ 成功。 5、测试个helloworldhelloworld.js var http = require('http');
http.createServer(function (req, res) {
res.writeHead(200, { 'Content-Type': 'text/plain' }); res.end('Hello World\n');
}).listen(1337, "127.0.0.1");
console.log('Server running at http://127.0.0.1:1337/');pm2启动试试看 [root@localhost www]# pm2 start helloworld.js --name 'helloworld'[PM2] Spawning PM2 daemon [PM2] PM2 Successfully daemonized [PM2] Starting helloworld.js in fork_mode (1 instance) [PM2] Done. ┌────────────┬────┬──────┬──────┬────────┬─────────┬────────┬─────────────┬──────────┐ │ App name │ id │ mode │ pid │ status │ restart │ uptime │ memory │ watching │ ├────────────┼────┼──────┼──────┼────────┼─────────┼────────┼─────────────┼──────────┤ │ helloworld │ 0 │ fork │ 2251 │ online │ 0 │ 0s │ 14.715 MB │ disabled │ └────────────┴────┴──────┴──────┴────────┴─────────┴────────┴─────────────┴──────────┘ Use `pm2 show <id|name>` to get more details about an app [root@localhost www]#pm2 monit
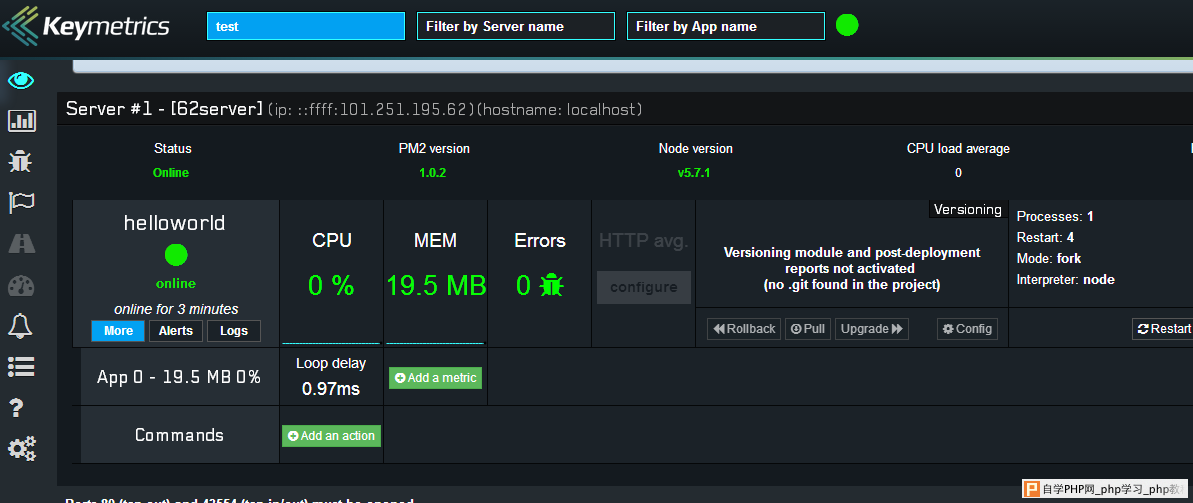
[root@localhost www]# pm2 startup centos
[PM2] Generating system init script in /etc/init.d/pm2-init.sh
[PM2] Making script booting at startup...
[PM2] /var/lock/subsys/pm2-init.sh lockfile has been added
[PM2] -centos- Using the command:
      su -c "chmod +x /etc/init.d/pm2-init.sh; chkconfig --add pm2-init.sh"[PM2] Done.
[root@localhost www]# pm2 save
[PM2] Dumping processes
要保存一下!
还有更厉害。 [root@localhost ~]# pm2 link key1 ke2 [62server][Keymetrics.io] Using (Public key: yklukcus7ugg7u6) (Private key: fhgynshuxtahahd)[Keymetrics.io] [Agent created] Agent ACTIVE - Web Access: https://app.keymetrics.io/ key1和key2是注册后官网给的。
系统提供监控的key
系统监控 6、补充问题,如何开放端口[root@localhost ~]# /sbin/iptables -I INPUT -p tcp --dport 1337 -j ACCEPT [root@localhost ~]# /etc/rc.d/init.d/iptables save iptables: Saving firewall rules to /etc/sysconfig/iptables:[ OK ] [root@localhost ~]# /etc/init.d/iptables status Table: filterChain INPUT (policy ACCEPT) num target prot opt source destination 1 ACCEPT tcp -- 0.0.0.0/0 0.0.0.0/0 tcp dpt:1337 全文完。 |
自学PHP网专注网站建设学习,PHP程序学习,平面设计学习,以及操作系统学习
京ICP备14009008号-1@版权所有www.zixuephp.com
网站声明:本站所有视频,教程都由网友上传,站长收集和分享给大家学习使用,如由牵扯版权问题请联系站长邮箱904561283@qq.com