主页 > 前端 > javascript >
来源:自学PHP网 时间:2017-06-06 10:05 作者: 阅读:次
[导读] 本文通过实例给大家介绍了SpringMVC+bootstrap-table,需要的朋友可以参考下...
|
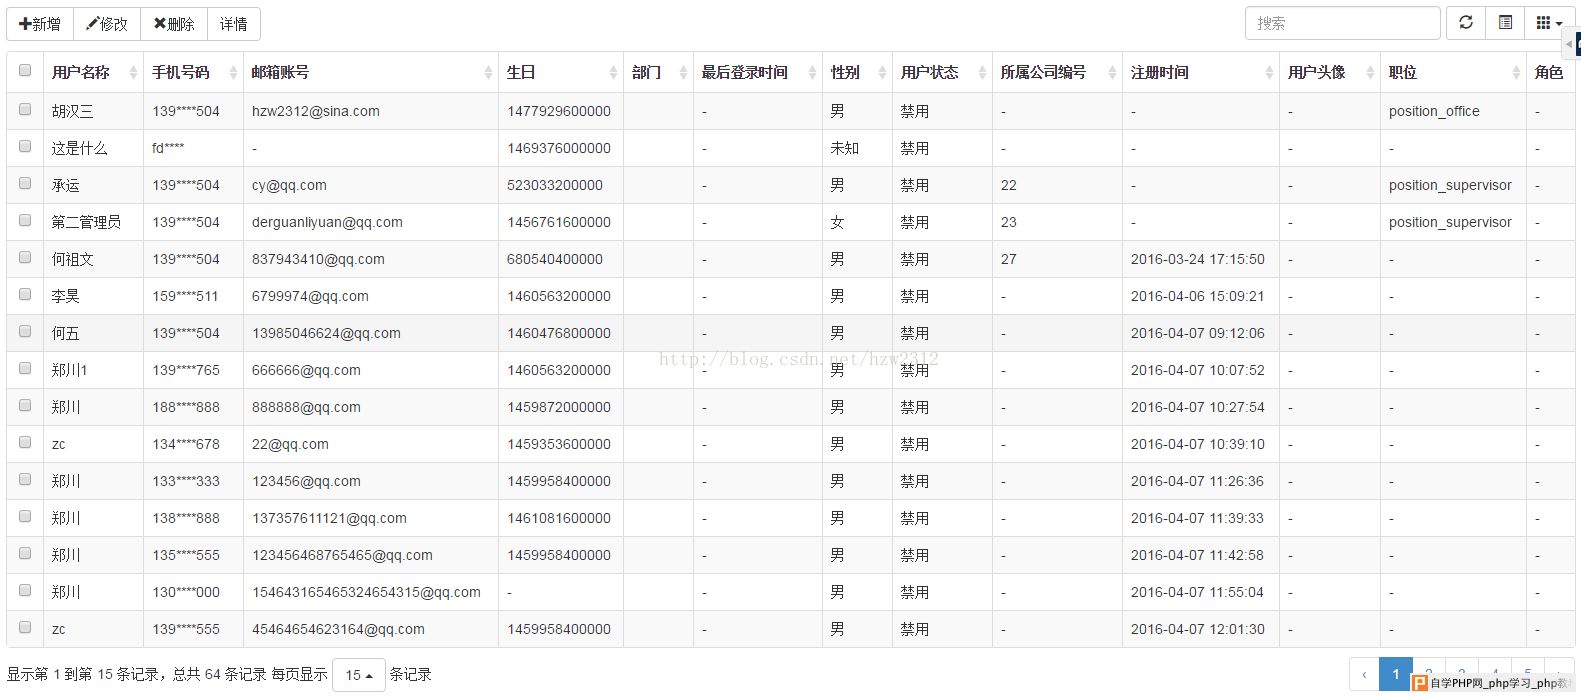
bootstrap-table下载地址:https://github.com/wenzhixin/bootstrap-table/ 先来看一张效果图:
下载下来后,需要导入的css:由于需要bootstrap的支持,所以需要导入bootstrap的css
<!-- Bootstrap -->
<link href="${contextPath }/static/bootstrap/css/bootstrap.min.css" rel="external nofollow"
  rel="stylesheet">
<link href="${contextPath }/static/bootstrap/table/bootstrap-table.css" rel="external nofollow"
  rel="stylesheet">
需要导入的js:除了bootstrap的js跟table的js外第一个要导入的就是jQuery的js,他们都是基于jQuery开发的
<!-- jQuery (necessary for Bootstrap's JavaScript plugins) -->
  <script src="${contextPath }/static/jquery/jquery.min.js"></script>
  <!-- Include all compiled plugins (below), or include individual files as needed -->
  <script src="${contextPath }/static/bootstrap/js/bootstrap.min.js"></script>
  <script src="${contextPath }/static/bootstrap/table/bootstrap-table.js"></script>
  <script src="${contextPath }/static/bootstrap/table/locale/bootstrap-table-zh-CN.js"></script>
bootstrap-table-zh-CN.js这个js是用来汉化table的提示文字的,在下载下来的bootstrap-table文件夹下的locale文件夹中有很多的语言包支持 完啦,我们只需要在html页面中声明一个table跟菜单div(如果不需要,可以不声明)就好:
<div class="container-fluid">
    <div id="toolbar" class="btn-group">
      <button id="btn_add" type="button" class="btn btn-default">
        <span class="glyphicon glyphicon-plus" aria-hidden="true"></span>新增
      </button>
      <button id="btn_edit" type="button" class="btn btn-default">
        <span class="glyphicon glyphicon-pencil" aria-hidden="true"></span>修改
      </button>
      <button id="btn_delete" type="button" class="btn btn-default">
        <span class="glyphicon glyphicon-remove" aria-hidden="true"></span>删除
      </button>
      <button id="btn_info" type="button" class="btn btn-default">
        <span class="fa fa-info" aria-hidden="true"></span>详情
      </button>
    </div>
    <table id="table_sysUser"></table>
  </div>
table_sysUser就是我们要显示的table列表啦。 我们来看看js怎么来请求后台的数据,并进行分页跟查询:
//项目根目录
var path = $("#contextPath").val();
$(document).ready(function() {
  //初始化Table
  var oTable = new TableInit();
  oTable.Init();
  //初始化页面上面的按钮事件
  $("#btn_add").click(function(){
    //新增
  });
  $("#btn_edit").click(function(){
    //编辑
  });
  $("#btn_info").click(function(){
    //详情
  });
  $("#btn_delete").click(function(){
    //删除
  });
});
var TableInit = function () {
  var oTableInit = new Object();
  //初始化Table
  oTableInit.Init = function () {
    $('#table_sysUser').bootstrapTable({
      url: path+'/sysuser/findUser.action',     //请求后台的URL(*)
      method: 'post',           //请求方式(*)
      toolbar: '#toolbar',        //工具按钮用哪个容器
      striped: true,           //是否显示行间隔色
      cache: false,            //是否使用缓存,默认为true,所以一般情况下需要设置一下这个属性(*)
      pagination: true,          //是否显示分页(*)
      sortable: true,           //是否启用排序
      sortName:"id",
      sortOrder: "desc",          //排序方式
      queryParams: oTableInit.queryParams,//传递参数(*)
      queryParamsType: 'limit',
      sidePagination: "server",      //分页方式:client客户端分页,server服务端分页(*)
      pageNumber:1,            //初始化加载第一页,默认第一页
      pageSize: 15,            //每页的记录行数(*)
      pageList: [10, 15, 20, 50],    //可供选择的每页的行数(*)
      search: true,            //是否显示表格搜索
      strictSearch: true,
      showColumns: true,         //是否显示所有的列
      showRefresh: true,         //是否显示刷新按钮
      minimumCountColumns: 2,       //最少允许的列数
      clickToSelect: true,        //是否启用点击选中行
      //height: 500,            //行高,如果没有设置height属性,表格自动根据记录条数觉得表格高度
      uniqueId: "id",           //每一行的唯一标识,一般为主键列
      showToggle:true,          //是否显示详细视图和列表视图的切换按钮
      cardView: false,          //是否显示详细视图
      detailView: false,          //是否显示父子表
      contentType: "application/x-www-form-urlencoded", //解决POST提交问题
      columns: [
           {checkbox: true },
      {title:'用户名称',field: 'userName',sortable:true },
      {title:'手机号码',field: 'phone',sortable:true,
         formatter:function(v,r,i){
          if(v){
            return v.substring(0,3)+"****"+v.substring(7,4);
          }
          return v;
        }
      },
      {title:'邮箱账号',field: 'email',sortable:true },
      {title:'生日',field: 'birthday',sortable:true },
      {title:'部门',field: 'departmentKey',sortable:true,
        formatter:function(v,r,i){
          if(r.departmentValue){
            return r.departmentValue;
          }
          return "";
        }
      },
      {title:'最后登录时间',field: 'lastLogintime',sortable:true },
      {title:'性别',field: 'sex',sortable:true,
        formatter:function(v,r,i){
          switch (Number(v)) {
          case 1:
            return "男";
            break;
          case 2:
            return "女";
            break;
          default:
            return "未知";
            break;
          }
        }
      },
      {title:'用户状态',field: 'status',sortable:true,
        formatter:function(v,r,i){
          return r.statusCn == "false"?"启用":"禁用";
        }
      },
      {title:'所属公司编号',field: 'companyId',sortable:true },
      {title:'注册时间',field: 'createTime',sortable:true },
      {title:'用户头像',field: 'userhead',sortable:true },
      {title:'职位',field: 'positionKey',sortable:true},
      {title:'角色',field:'role'}]
    });
  };
  //得到查询的参数
  oTableInit.queryParams = function (params) {
    var temp = {  //这里的键的名字和控制器的变量名必须一直,这边改动,控制器也需要改成一样的
      pageSize: params.limit,  //页面大小
  <span style="white-space:pre">    </span>pageNumber: params.pageNumber, //页码
  <span style="white-space:pre">    </span>sortName: params.sort,<span style="white-space:pre"> </span>//排序列名
  <span style="white-space:pre">    </span>sortOrder:params.order,<span style="white-space:pre">  </span>//排序方式
  <span style="white-space:pre">    </span>searchText:params.search<span style="white-space:pre">  </span>//搜索框参数
    };
    return temp;
  };
  return oTableInit;
};
很多参数在代码注释里面说得很明显啦,我们来说说怎么新增查询参数,我们只需要在queryParams方法里面在新增参数信息就行:
oTableInit.queryParams = function (params) {
    var temp = {  //这里的键的名字和控制器的变量名必须一直,这边改动,控制器也需要改成一样的
      pageSize: params.limit,  //页面大小
      pageNumber: params.pageNumber, //页码
      sortName: params.sort, //排序列名
      sortOrder:params.order, //排序方式
      searchText:params.search,  //搜索框参数
      searchText:params.search,  //搜索框参数
    };
    return temp;
  };
bootstrap-table获取页面上勾选的数据:
var rowData = $("#table_sysUser").bootstrapTable("getSelections");
bootstrap-table刷新表格:
$('#table_sysUser').bootstrapTable('refresh');
|
自学PHP网专注网站建设学习,PHP程序学习,平面设计学习,以及操作系统学习
京ICP备14009008号-1@版权所有www.zixuephp.com
网站声明:本站所有视频,教程都由网友上传,站长收集和分享给大家学习使用,如由牵扯版权问题请联系站长邮箱904561283@qq.com