来源:自学PHP网 时间:2015-04-16 10:50 作者: 阅读:次
[导读] 背景:之前实现的mysql同步复制功能(见笔者之前文章http: blog csdn net kingofworld article details 39210937)只是双机热备功能,还不能做到Mysql链接的自动切换。本配置实现真正的mysql集群,使得...
|
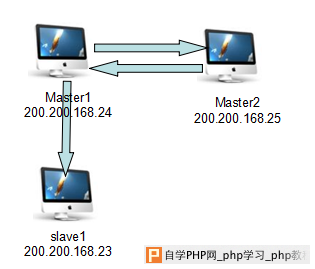
背景:之前实现的mysql同步复制功能(见笔者之前文章http://blog.csdn.net/kingofworld/article/details/39210937)只是双机热备功能,还不能做到Mysql链接的自动切换。 本配置实现真正的mysql集群,使得在某台机子的mysql应用停止时,能让应用程序自动切换到另外一台机子的mysql连接,实现应用的高稳定性,并且使得扩展Mysql服务成为可能。 本配置使用mysql-mmm(master-master Replication Manager for MySQL)组件实现集群功能。 本次演示的配置使用三台机器,架构如下:
Master1 和Master2两台机器实现双机热备,其中一台机器的mysql服务停止或机器宕机,应用程序都会将数据库连接自动切换到另外一台机子。另外用一台机子实时备份master1的数据。 1、安装mysql-mmm服务 在三台机器都安装 wget http://dl.fedoraproject.org/pub/epel/6/x86_64/epel-release-6-8.noarch.rpm rpm -ivh epel-release-6-8.noarch.rpm yum -y install mysql-mmm* 完成后查看 rpm -qa|grep mysql-mmm 有以下组件表示安装成功 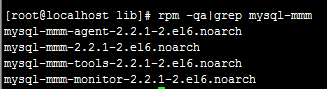
Rhel5或centos5,32位:http://dl.fedoraproject.org/pub/epel/5/i386/epel-release-5-4.noarch.rpm Rhel6或centos6,32位:http://dl.fedoraproject.org/pub/epel/6/i386/epel-release-6-5.noarch.rpm Rhel6或centos6,64位:http://dl.fedoraproject.org/pub/epel/6/x86_64/epel-release-6-8.noarch.rpm 1、添加mysql的用户 在三台机器都添加mysql用户,分别用于复制、 进入mysql服务mysql -u root -p use mysql; grant REPLICATION slave,REPLICATION CLIENT on *.* to 'repl'@'%' identified by 'password'; //建立复制用户 grant PROCESS,SUPER,REPLICATION CLIENT on *.* to 'mmm_agent'@'%' identified by 'password'; //建立agent用户 grant REPLICATION CLIENT on *.* to 'mmm_monitor'@'%' identified by 'password'; //建立用户 FLUSH PRIVILEGES; 2、配置同步复制 配置复制的策略如架构图所示。 配置方法在我上一篇文章有介绍过,这里不再重复,见笔者之前文章http://blog.csdn.net/kingofworld/article/details/39210937 3、修改hosts 分别修改三台机器的hosts文件 vi /etc/hosts 添加 200.200.168.24 M1 200.200.168.25 M2 200.200.168.23 slave1 4、配置mysql-mmm 修改 /etc/mysql-mmm/mmm_common.conf 各台机子的配置都一样
active_master_role      writer

<host default>
    cluster_interface       eth0
    pid_path                /var/run/mysql-mmm/mmm_agentd.pid
    bin_path                /usr/libexec/mysql-mmm/
    replication_user        repl
    replication_password    password
    agent_user              mmm_agent
    agent_password          <span style="font-size: 13.3333339691162px;">password</span>
</host>

<host M1>
    ip      200.200.168.24
    mode    master
    peer    M2
</host>

<host M2>
    ip      200.200.168.25
    mode    master
    peer    M1
</host>

<host slave1>
    ip      200.200.168.23
    mode    slave
</host>

<role writer>
    hosts   M1,M2
    ips     200.200.168.26
    mode    exclusive
</role>

<role reader>
    hosts   M1,M2,slave1
    ips     200.200.168.27
    mode    balanced
</role>
注意:200.200.168.26和200.200.168.27是两个虚拟的IP地址,供应用程序调用,只需用两个没人占用的IP就可以,分别用来提供写和读服务,为以后实现数据库的读写分离(但实现读写分离需要修改应用程序,mysql并不能自动识别并切换)。 修改/etc/mysql-mmm/mmm_agent.conf 三台机器分别设置为this M1、this M2、this slave1 修改/etc/mysql-mmm/mmm_mon.conf 只是monitor(200.200.168.24)机子需要配置
include mmm_common.conf
<monitor>
    ip                  127.0.0.1
    pid_path            /var/run/mysql-mmm/mmm_mond.pid
    bin_path            /usr/libexec/mysql-mmm
    status_path         /var/lib/mysql-mmm/mmm_mond.status
    ping_ips            200.200.168.24,200.200.168.25,200.200.168.23
    auto_set_online     10

    # The kill_host_bin does not exist by default, though the monitor will
    # throw a warning about it missing.  See the section 5.10 "Kill Host
    # Functionality" in the PDF documentation.
    #
    # kill_host_bin     /usr/libexec/mysql-mmm/monitor/kill_host
    #
</monitor>
<host default>
    monitor_user        mmm_monitor
    monitor_password    password
</host>
debug 0
配置完成后运行 三台机子都需运行: /etc/init.d/mysql-mmm-agent start Monitor机子运行 /etc/init.d/mysql-mmm-monitor start 5、查看服务状态及测试 在monitor机子运行mmm_control show 可以看到以下信息: 
表示写服务器(200.200.168.26)使用的是200.200.168.24 读服务器(200.200.168.27)使用的是200.200.168.25 查看各个服务的状态: mmm_control checks all 
6、测试: 将master1的mysql服务停止,然后mmm_control show查看状态 
可以看到读写服务器都转移到了master2,这时服务器master1的流程应用还能够正常使用,可以进行申请流程测试 这时查看mmm_control checks all 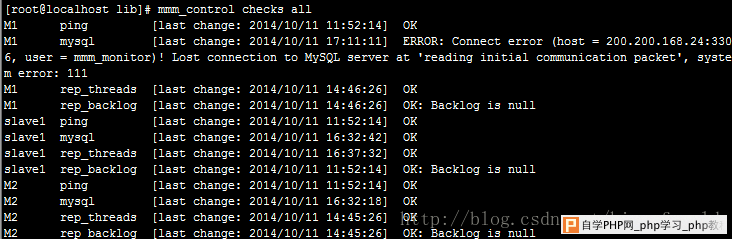 将master1 的mysql服务启动,再查看状态: 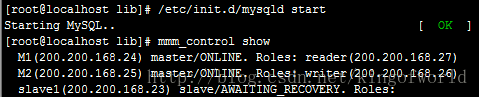
读写服务器又分开了  |
自学PHP网专注网站建设学习,PHP程序学习,平面设计学习,以及操作系统学习
京ICP备14009008号-1@版权所有www.zixuephp.com
网站声明:本站所有视频,教程都由网友上传,站长收集和分享给大家学习使用,如由牵扯版权问题请联系站长邮箱904561283@qq.com